|
|
| (2 intermediate revisions by 2 users not shown) |
| Line 1: |
Line 1: |
| | | | |
| | {{#widget:YouTube|id=EodPrJYTEdc|height=300|width=400}} | | {{#widget:YouTube|id=EodPrJYTEdc|height=300|width=400}} |
| | + | |
| | | | |
| | = Instructions = | | = Instructions = |
| Line 6: |
Line 7: |
| | 1. Click on the symbol "Table" in the edit toolbar.<br/> | | 1. Click on the symbol "Table" in the edit toolbar.<br/> |
| | | | |
| − | {| border="1" cellspacing="1" cellpadding="5" style="width: 500px;" | + | {| cellspacing="1" cellpadding="5" border="1" style="width: 500px" |
| | |- | | |- |
| − | | [[File:Insert table.jpg|none|600px|alt=Insert table.jpg]] | + | | [[File:Insert table.jpg|border|left|600px|Insert table|alt=Insert table.jpg]] |
| | |} | | |} |
| | | | |
| Line 15: |
Line 16: |
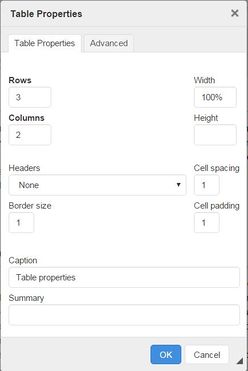
| | 3. Choose your desired table properties.<br/> | | 3. Choose your desired table properties.<br/> |
| | | | |
| − | [[File:Tabelle eigenschaften.JPG|frame|left|248px|alt=Tabelle eigenschaften.JPG]]<br/><br/> | + | {| style="width:100%" |
| − | | + | |- |
| | + | | [[File:Tabelle eigenschaften.JPG|border|left|248px|table properties|alt=Tabelle eigenschaften.JPG]] |
| | + | | |
| | *Enter the number of "Rows" and "Columns" you need. | | *Enter the number of "Rows" and "Columns" you need. |
| − | *Its advisable to choose "Width"=100% percent. Then the table will just adapt to the width of the article automatically.<br/>
| + | *The option “Border size“ allows you to specify the width of the table border. If the border size is "0" or empty, the table will not have any border. |
| − | *The panel “Border size“ allows you to specify the strength of the table grid lines in pixels. “0“ hides the grid.<br/> | + | *You can enter a title in the caption field that will be shown on the top of the table. |
| − | *Choose where to align the table (right, left or center) with "Alignment".<br/>
| + | *width describes the tables width.It is advisable to choose "Width"=100% percent. Then the table will automatically align itself to the article width and teh article will not be skewed. |
| − | *You can enter a title in the caption field that will be shown on top of the table. | + | *Cell spacing describes the space between the cells in the tables in pixels<br/> |
| | + | *Cell padding describes the space between the cells' borders and the text inside them |
| | | | |
| − | <br/>
| + | |} |
| | | | |
| − | 4. After clicking "OK" the table will show up.<br/> | + | <br/><br/><br/>4. Clikc "OK" and the table will be displayed.<br/> |
| | | | |
| | {| cellspacing="1" cellpadding="5" border="1" align="left" style="width: 100%" | | {| cellspacing="1" cellpadding="5" border="1" align="left" style="width: 100%" |
| Line 31: |
Line 35: |
| | |- | | |- |
| | | | | | |
| − | | <br/>
| |
| | | <br/> | | | <br/> |
| | |- | | |- |
| − | | <br/>
| |
| | | <br/> | | | <br/> |
| | | <br/> | | | <br/> |
| | |- | | |- |
| − | | <br/>
| |
| − | | <br/>
| |
| − | | <br/>
| |
| − | |-
| |
| − | | <br/>
| |
| − | | <br/>
| |
| − | | <br/>
| |
| − | |-
| |
| − | | <br/>
| |
| − | | <br/>
| |
| − | | <br/>
| |
| − | |-
| |
| − | | <br/>
| |
| − | | <br/>
| |
| − | | <br/>
| |
| − | |-
| |
| − | | <br/>
| |
| − | | <br/>
| |
| − | | <br/>
| |
| − | |-
| |
| − | | <br/>
| |
| | | <br/> | | | <br/> |
| | | <br/> | | | <br/> |
| | |} | | |} |
| − |
| |
| − | <br/><br/>
| |
| | | | |
| | <br/> | | <br/> |
| | | | |
| − | <br/><br/>
| |
| | | | |
| − | = Change the Table Properties<br/> = | + | = Changing the Table Properties<br/> = |
| | | | |
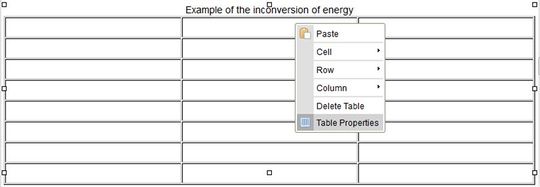
| | Right click on the table to get the following options.<br/> | | Right click on the table to get the following options.<br/> |
| − | | + | [[File:Tabelle editieren 1.JPG|border|left|540px|Editing a table|alt=Editing a table]]<br/><div style="clear: both"></div> |
| − | {| border="1" cellspacing="1" cellpadding="5" style="width: 500px;"
| + | <br/> |
| − | |-
| + | |
| − | | [[File:Tabelle editieren 1.JPG|frame|left|540px|alt=Tabelle editieren 1.JPG]]<br/><br/>
| + | |
| − | |}
| + | |
| − | | + | |
| − | <br/><br/> | + | |
| | | | |
| | <u>For example:</u> | | <u>For example:</u> |
| | | | |
| − | *delete or insert cells, rows and columns etc. | + | *Delete or insert cells, rows and columns etc. |
| | *"Merge Right" (or left) to merge two cells to one.<br/> | | *"Merge Right" (or left) to merge two cells to one.<br/> |
| | *Change the colour of a cell: "Cell" -> "Cell Properties" -> "Background Colour" | | *Change the colour of a cell: "Cell" -> "Cell Properties" -> "Background Colour" |
| Line 92: |
Line 65: |
| | | | |
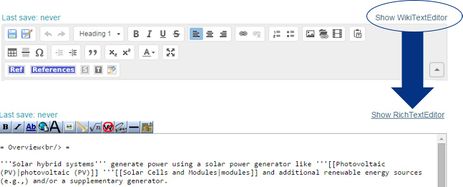
| | You can of course also create a table in the wiki text but this is not that easy. However, once you know what you are doing it is a comfortable tool for editing tables. | | You can of course also create a table in the wiki text but this is not that easy. However, once you know what you are doing it is a comfortable tool for editing tables. |
| − | | + | [[File:Show Wiki Text Editor.JPG|border|left|463px|Show wiki text editor|alt=Show Wiki Text Editor.JPG]]<div style="clear: both"></div> |
| − | [[File:Show Wiki Text Editor.JPG|none|463px|alt=Show Wiki Text Editor.JPG]] | + | |
| − | | + | |
| | <br/> | | <br/> |
| | | | |
| Line 101: |
Line 72: |
| | Some basic explanations: | | Some basic explanations: |
| | | | |
| − | *cell spacing describes the space between the cells in the tables in pixels<br/> | + | *Cell spacing describes the space between the cells in the tables in pixels<br/> |
| − | *cell padding describes the space between the cells' borders and the text inside them<br/> | + | *Cell padding describes the space between the cells' borders and the text inside them<br/> |
| − | *width describes the tables width. Note that it is possible to give cells a specific width which will be used for all the cells in a column. | + | *Width describes the tables width. Note that it is possible to give cells a specific width which will be used for all the cells in a column. |
| | | | |
| | <br/> | | <br/> |
1. Click on the symbol "Table" in the edit toolbar.
3. Choose your desired table properties.
Right click on the table to get the following options.
You can of course also create a table in the wiki text but this is not that easy. However, once you know what you are doing it is a comfortable tool for editing tables.
It is also possible to import existing Excel tables into energypedia. Here, you can find a detailed description of the Excel to wiki import.