|
|
| (One intermediate revision by one user not shown) |
| Line 1: |
Line 1: |
| | + | |
| | = Inserting Images = | | = Inserting Images = |
| | + | |
| | {{#widget:YouTube|id=BtNrfgydYpQ|height=300|width=500}} | | {{#widget:YouTube|id=BtNrfgydYpQ|height=300|width=500}} |
| | | | |
| | = Instructions = | | = Instructions = |
| | + | |
| | 1. Before you can insert any document or picture in your article '''you need to upload the corresponding file''' into the wiki! | | 1. Before you can insert any document or picture in your article '''you need to upload the corresponding file''' into the wiki! |
| | + | |
| | *Follow the steps as described here: "[[Uploading Pictures and Documents|Uploading Pictures and Documents]]" | | *Follow the steps as described here: "[[Uploading Pictures and Documents|Uploading Pictures and Documents]]" |
| | | | |
| | + | <br/>2. Click on the "Image" option in the edit toolbar. |
| | | | |
| − | 2. Click on the "Image" option in the edit toolbar.
| + | [[File:Bild laden.JPG|border|600px|Inserting files or documents|alt=Inserting files or documents]] |
| − | | + | |
| − | [[File:Bild laden.JPG|border|600px|Inserting files or documents]] | + | |
| | <div style="clear: both"></div> | | <div style="clear: both"></div> |
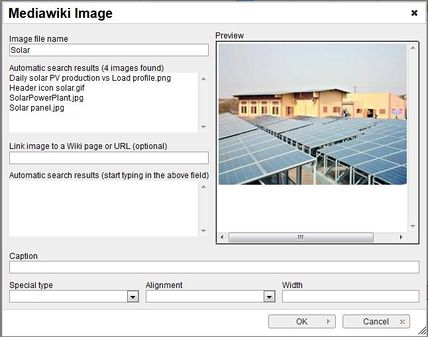
| − | | + | <br/>3. For the option, "image file name" , type the name of the file you want to use. |
| − | | + | |
| − | 3. For the option, "image file name" , type the name of the file you want to use. | + | |
| | | | |
| | [[File:Bild eigenschaften.JPG|none|428px|Choose image|alt=Choose image]]<br/> | | [[File:Bild eigenschaften.JPG|none|428px|Choose image|alt=Choose image]]<br/> |
| | <div style="clear: both"></div> | | <div style="clear: both"></div> |
| − |
| |
| | *The option "Alignment" provides the opportunity to put the image right, left or center of the article. | | *The option "Alignment" provides the opportunity to put the image right, left or center of the article. |
| − | *Text entered in the panel “Caption” will be shown when you move the cursor over the graph or as caption when you chose the "Special type" -> "frame". If you choose "frame" under then you cannot reset the size of the image. | + | *Text entered in the panel “Caption” will be shown when you move the cursor over the graph or as caption when you chose the "Special type" -> "frame". If you choose "frame", then you cannot reset the size of the image. |
| | | | |
| | + | <br/>4. Click on OK. The graph will now appear in the edited text. |
| | | | |
| − | 4. Click on OK. The graph will now appear in the edited text.
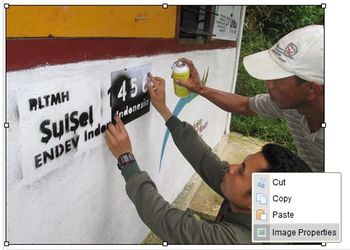
| + | 5. To change a file´s height or alignment, scroll over the picture or filename, then right click and choose <u>"Image Properties"</u>. |
| − | | + | |
| − | 5. To change a file´s height or alignment, scroll over the picture or filename click on it with the right mouse button and choose <u>"Image Properties"</u>. | + | |
| | | | |
| | [[File:Bild ändern.JPG|none|350px|Image Properties|alt=Image Properties]] | | [[File:Bild ändern.JPG|none|350px|Image Properties|alt=Image Properties]] |
| − | | + | <br/><div style="clear: both"></div> |
| − | <br/> <div style="clear: both"></div> | + | |
| − | | + | |
| | 6. To remove a graph from the article highlight it in the edit mode and press delete on your keyboard. | | 6. To remove a graph from the article highlight it in the edit mode and press delete on your keyboard. |
| | | | |
| | <br/> | | <br/> |
| | + | |
| | = Inserting File = | | = Inserting File = |
| | | | |
| − | * For inserting file as a picture, see [[Insert File as Picture / Link#Insert File as Picture|Insert File as Picture]] | + | *For inserting file as a picture, see [[Insert File as Picture / Link#Insert File as Picture|Insert File as Picture]] |
| − | * For inserting file as a link, see [[Insert File as Picture / Link#Insert File as Link|Insert File as Link]] | + | *For inserting file as a link, see [[Insert File as Picture / Link#Insert File as Link|Insert File as Link]] |
| | | | |
| | <br/>__NOAUTHORLIST__ | | <br/>__NOAUTHORLIST__ |
| | | | |
| | [[Category:Articles]] | | [[Category:Articles]] |
1. Before you can insert any document or picture in your article you need to upload the corresponding file into the wiki!
5. To change a file´s height or alignment, scroll over the picture or filename, then right click and choose "Image Properties".
6. To remove a graph from the article highlight it in the edit mode and press delete on your keyboard.