|
|
| (16 intermediate revisions by 3 users not shown) |
| Line 2: |
Line 2: |
| | You can upload pictures and documents to the gallery in order to link them into an article. | | You can upload pictures and documents to the gallery in order to link them into an article. |
| | | | |
| − | However, always keep in mind that [[What is Energypedia|energypedia is]] not a file sharing / storing system. | + | However, always keep in mind that [[What is Energypedia|energypedia is]] not a file sharing / storing system. Also, please make sure to [[Set References|quote correctly]] in order to avoid plagiarism. |
| | | | |
| − | Please be restrained regarding your uploading behaviour and think first if it is really necessary to upload a file or not. There are other ways to incorporate content without uploading a document. For example, you can link to the file available on the internet or you can try to include the file content in an article (BUT please make sure to [[Insert Footnotes and References|quote correctly]] in order to avoid plagiarism).
| + | {{#widget:YouTube|id=yV_mHnlYkHM|height=300|width=400}} |
| | | | |
| | <br/> | | <br/> |
| − | <p style="text-align: center">[[File:Attention.JPG|577px|RTENOTITLE]]</p>
| |
| − | <br/>
| |
| − |
| |
| − | == Option 1<br/> ==
| |
| | | | |
| − | 1. Click <u>Upload file</u> in the toolbox on the left.
| + | = Instructions = |
| | | | |
| − | [[File:Upload file.JPG|128px|Upload file.JPG|alt=Upload file.JPG]]
| + | 1. Click on the option '''Upload file''' in the toolbox on the left corner of the page. |
| | | | |
| | + | [[File:Upload file.JPG|border|left|128px|Upload file.JPG|alt=Upload file.JPG]] |
| | + | <div style="clear: both"></div> |
| | <br/> | | <br/> |
| | | | |
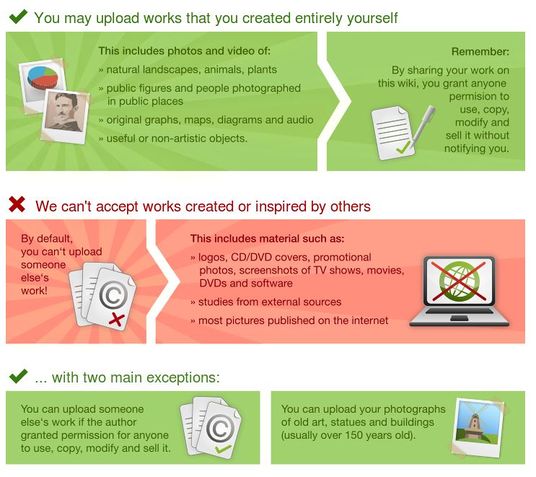
| | 2. You will be directed to the Upload Wizard. Please read the given rules! | | 2. You will be directed to the Upload Wizard. Please read the given rules! |
| | | | |
| − | [[File:Upload wizard.jpg|left|536px|Upload wizard.jpg|alt=Upload wizard.jpg]] | + | [[File:Upload wizard.jpg|border|left|536px|Upload wizard.jpg|alt=Upload wizard.jpg]] |
| − | | + | <div style="clear: both"></div> |
| | <br/> | | <br/> |
| | | | |
| − | <br/>
| + | 3. Click on the "'''Next'''" button at the bottom of the page. |
| − | | + | |
| − | <br/>
| + | |
| − | | + | |
| − | <br/>
| + | |
| − | | + | |
| − | <br/>
| + | |
| − | | + | |
| − | <br/>
| + | |
| − | | + | |
| − | <br/>
| + | |
| − | | + | |
| − | <br/>
| + | |
| − | | + | |
| − | <br/>
| + | |
| − | | + | |
| − | <br/>
| + | |
| − | | + | |
| − | <br/>
| + | |
| − | | + | |
| − | <br/>
| + | |
| − | | + | |
| − | <br/>
| + | |
| − | | + | |
| − | <br/>
| + | |
| − | | + | |
| − | <br/>
| + | |
| − | | + | |
| − | <br/>
| + | |
| − | | + | |
| − | <br/>
| + | |
| − | | + | |
| − | <br/>
| + | |
| − | | + | |
| − | <br/>
| + | |
| − | | + | |
| − | 3. Click the "Next" button at the bottom of the page to be directed to the upload tool. | + | |
| − | | + | |
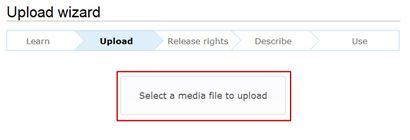
| − | 4. Click on the button "Select a media file to upload".<br/>[[File:Durchsuchen.JPG|410px|Durchsuchen.JPG|alt=Durchsuchen.JPG]]
| + | |
| | | | |
| | + | 4. Click on the button "'''Select a media file to upload'''".<br/>[[File:Durchsuchen.JPG|border|left|410px|Upload wizard|alt=Durchsuchen.JPG]] |
| | + | <div style="clear: both"></div> |
| | <br/> | | <br/> |
| | | | |
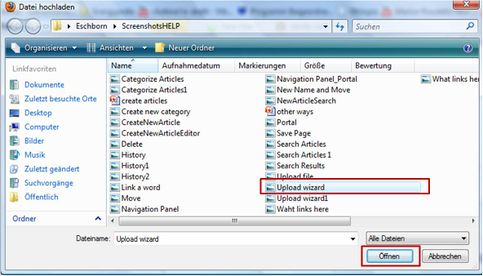
| | 5. The file browser opens and allows you to choose a file from your computer. Highlight the respective file and click "Open". | | 5. The file browser opens and allows you to choose a file from your computer. Highlight the respective file and click "Open". |
| | | | |
| − | <br/>[[File:400px-Choose file.JPG|483px|400px-Choose file.JPG|alt=400px-Choose file.JPG]] | + | <br/>[[File:400px-Choose file.JPG|border|left|483px|choosing file|alt=400px-Choose file.JPG]] |
| − | | + | <div style="clear: both"></div> |
| | <br/> | | <br/> |
| | | | |
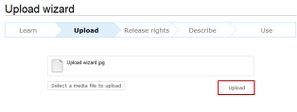
| | 5. Click "Upload". | | 5. Click "Upload". |
| | | | |
| − | [[File:Upload button.JPG|297px|Upload button.JPG|alt=Upload button.JPG]] | + | [[File:Upload button.JPG|border|left|297px|Upload button|alt=Upload button.JPG]] |
| − | | + | <div style="clear: both"></div> |
| | <br/> | | <br/> |
| | | | |
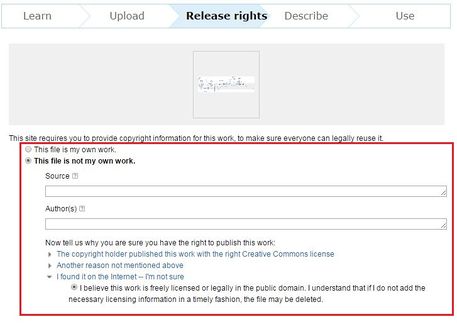
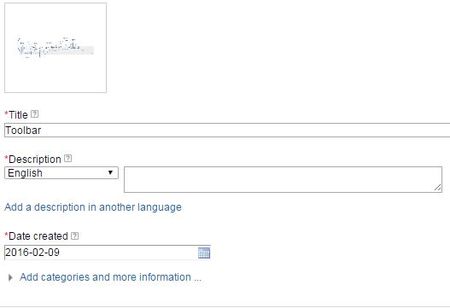
| | 6. Before you can use the file, add licensing and source information as well as a description and categories. | | 6. Before you can use the file, add licensing and source information as well as a description and categories. |
| | | | |
| − | [[File:UploadWizardLicensing.jpg|none|457px|UploadWizardLicensing.jpg|alt=UploadWizardLicensing.jpg]] | + | [[File:UploadWizardLicensing.jpg|border|left|457px|Upload Wizard Licensing|alt=UploadWizardLicensing.jpg]] |
| − | | + | <div style="clear: both"></div> |
| | [[File:UploadWizardDescription.jpg|none|450px|UploadWizardDescription.jpg|alt=UploadWizardDescription.jpg]] | | [[File:UploadWizardDescription.jpg|none|450px|UploadWizardDescription.jpg|alt=UploadWizardDescription.jpg]] |
| − | | + | <div style="clear: both"></div> |
| | 7. The uploaded file can now be put into any article: [[Insert Pictures or Documents|Insert Pictures or Documents]] | | 7. The uploaded file can now be put into any article: [[Insert Pictures or Documents|Insert Pictures or Documents]] |
| − | *To insert a picture/pdf as picture preview, see [[Insert_File_as_Picture_/_Link#Insert_File_as_Picture|Insert File as Picture]] | + | |
| − | *To insert a link to a picture/pdf/word-document, see [[Insert_File_as_Picture_/_Link#Insert_File_as_Link|Insert File as Link]] | + | *To insert a picture/pdf as picture preview, see [[Insert File as Picture / Link#Insert File as Picture|Insert File as Picture]] |
| | + | *To insert a link to a picture/pdf/word-document, see [[Insert File as Picture / Link#Insert File as Link|Insert File as Link]] |
| | | | |
| | <br/> | | <br/> |
| | | | |
| − | == Option 2 == | + | = Find the Uploaded Document = |
| | | | |
| − | 1. Click "Uploads/Filegallery" in the upper toolbar.
| + | *To find the uploaded file, type '''File:Name of the File''' in the search. |
| − | | + | *Optional: Click "Recent changes" on the left in the navigation and find your upload in the history of recent activities. |
| − | [[File:Uploads gallery 4.JPG|131px|Uploads gallery 4.JPG|alt=Uploads gallery 4.JPG]]
| + | |
| | | | |
| | <br/> | | <br/> |
| | | | |
| − | 2. Then click on "Upload new file".
| + | = Name the Document = |
| | | | |
| − | [[File:Upload new file 2.JPG|396px|Upload new file 2.JPG|alt=Upload new file 2.JPG]]
| + | <u>Please follow the following standard for naming the uploaded document:</u> |
| | | | |
| − | <br/>
| + | *Titel_Year |
| | | | |
| − | 3. You will be directed to the Upload Wizard. Proceed with Option 1 / Step 2 (see above).
| + | <u>For example:</u> |
| | | | |
| − | <br/>
| + | *A Discussion of SHS in Developing Countries_2003 |
| − | | + | |
| − | == Find the Uploaded Document ==
| + | |
| − | | + | |
| − | *By filename: Click "Uploads / Filegalery" on the left in the navigation. Search the document by its filename. | + | |
| − | *Optional: Click "Recent changes" on the left in the navigation and find your upload in the history of recent activities.
| + | |
| | | | |
| − | <br/>__NOAUTHORLIST__ | + | <br/><br/>__NOAUTHORLIST__ |
| | | | |
| | [[Category:Articles]] | | [[Category:Articles]] |
You can upload pictures and documents to the gallery in order to link them into an article.
1. Click on the option Upload file in the toolbox on the left corner of the page.
2. You will be directed to the Upload Wizard. Please read the given rules!
3. Click on the "Next" button at the bottom of the page.
4. Click on the button "
".
5. The file browser opens and allows you to choose a file from your computer. Highlight the respective file and click "Open".
5. Click "Upload".
6. Before you can use the file, add licensing and source information as well as a description and categories.